As a fitness professional, you read about gluteal amnesia and learn that chronic sitting keeps shutting down the glutes. Your clients take your advice and sit less. Some get standing desks; some take walking breaks; some even add stair climbing through the day.
The problem of sleepy glutes that just won’t fire still persists, though. Over time, the problem gets worst. Low back and sacroiliac pain show up, workout fatigue increases and training progress starts to decline.
How do we fix such gluteal amnesia? The most common fix is surprisingly simple, but often overlooked.
What’s the Fix?
The fix is often following a 4-step pre-workout sequence. The sequence takes less than 5 minutes. The key to making it work is don’t skip steps.
Step 1: Remove arthrogenic inhibition
Step 1 is the critical step that most fitness professionals overlook.
How: Have your client perform what physical therapists refer to as the “shotgun” technique.
Follow these steps:
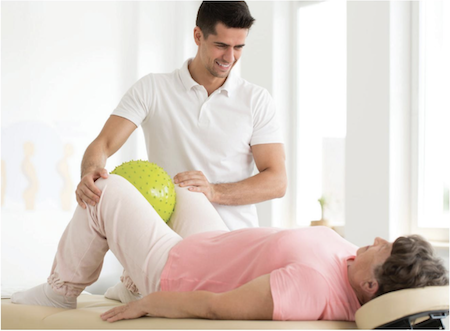
- Have the client lie on his back with hips and knees bent close to 90 degrees, as if they were going to perform a hip bridge.
- Place a small squishy ball (like Pilates ball or kid’s kickball) between the client’s knees. Have them moderately squeeze the ball for 30 seconds.
- Before letting the ball go, have them quickly push their knees into the ball and then release.
Why it works: Muscles are the outer layer surrounding joints. Both muscles and joints respond to a shared set of nerves. When the inner parts of a joint lack roll, spin or glide due to chronic postures, compensations or injuries, they send faulty signals to the spinal cord. Faulty input creates faulty output. “Shotgun” is one of the first line techniques to reset the hip joint region input-output reflex loop; this reset allows the gluteal motor neurons to fire with more excitement.
Step 2: Inhibit the antagonists
Step 2 is commonly misunderstood. The effect comes from holding a trigger point, not continuously rolling over it.
How: Self trigger point release
- Have the client roll their hip flexors and adductors on a roller or ball to scan for tender spots.
- Have the client stop on a tender spot and melt their body weight into the tension for 30 seconds. The release only works if you coach the client in breathing and relaxing into the spot, as opposed to pushing hard into it.
- Repeat for 2-3 additional spots on each side. Note that spots can be different on the right and left, and their location may shift from day to day.
Why it works: Muscles work in agonist-antagonist pairs. Agonists are the prime movers; in this case the gluteus maximus. Antagonists are the muscles on the opposite side of the joint. In the gluteus maximus’ case, the hip flexor and adductor muscle groups are antagonists. When antagonist muscles develop areas of increased neurological tone due to continued postures and repetitious movements, they cannot properly lengthen. When these muscles cannot properly lengthen, they alter the nervous system input. Faulty input leads to faulty output in both the agonist and its antagonists.
Performing self trigger point release to tender spots in the hip flexor and adductor complex activates the golgi tendon organs by temporarily deforming the muscle into a slow small stretch. The golgi tendon organs signal the involved muscles to relax. This helps normalize their ability to lengthen, which normalizes the nervous system input and output. It is like the leash that was holding the gluteal firing back has been released.
Will a massage gun work instead? Maybe. The vibration does temporarily deform the muscle tissue to signal the golgi tendon organ relaxation response. Higher frequencies, such as the vibration versus continuously holding a spot, may facilitate instead of inhibiting. The only way to know if it works for your client is by trying it, as individual responses may vary.
Step 3: Activate the glutes
Step 3 is commonly confused with resistance training, or compound movements like squats.
How: Activation
- Pick a common isolated hip extension exercise such as glute kickback on all fours, or hip thrust exercise with shoulders on the bench. Do not add weight.
- Have the client perform 10 reps of the exercise; instead of cueing for time under tension, cue the client to completely reset and think about squeezing the glutes prior to initiating each repetition. If the client is already in motion, the synergists are already substituting for the gluteus maximus. Resetting each rep minimizes such compensation.
Why it works: This internal cueing to feel gluteal sensation combined with a reset before each repetition allows the client to re-establish conscious awareness of proper muscle firing sensations. Loading the movement, or selecting a compound movement will shield the gluteals from re-establishing this nervous system connection. When this step is skipped, the substituting muscles get stronger, and the glutes continue to be shielded from making effective contributions.
Step 4: Include a potentiation set
When clients perform a general warm-up, they often skip the potentiation set for major lifts. Skipping this step bypasses the critical connection needed for effective gluteal contribution in compound lifts.
How: Potentiate
- Perform each desired lift (i.e. back squat, front squat, sumo squat, lunge, deadlift, etc.) at 50% of the intended working weight for one set of 8-10 repetitions.
How it works: The potentiation set creates proper muscle fiber recruitment and motor unit synchronization to orchestrate the correct activation and timing for each muscle to participate. This step does not replace the previous three steps, but rather serves to link all of the preparatory components together for compound movements with less compensation. Less compensation provides an opportunity for the glutes to contribute a new level of activation.
Next Steps
Help your clients fix their gluteal amnesia by including these four steps (in order) as part of their warm-up sequence.
If you find that the client’s gluteal amnesia persists, have the client consult with an allied health provider (such as a Physical Therapist, Chiropractor or Medical Massage Therapist) to identify and further target his unique source of arthrogenic inhibition. Removing the arthrogenic inhibition is like having the correct keys for a car. The glutes will only fire if they have the opportunity to get started.
Dr. Meredith Butulis, DPT, OCS, CEP, CSCS, CPT, PES, CES, BCS, Pilates-certified, Yoga-certified, has been working in the fitness and rehabilitation fields since 1998. She is the creator of the Fitness Comeback Coaching Certification, author of the Mobility | Stability Equation series, Host of the “Fitness Comeback Coaching Podcast,” and Assistant Professor the State College of Florida. She shares her background to help us reflect on our professional fitness practices from new perspectives that can help us all grow together in the industry. Instagram: @Dr.MeredithButulis.